Dash cams have revolutionized the way we perceive road safety and vehicle security. In this comprehensive guide we’ll help you to understand how to install dash cams. We delve into the intricate world of dash cams. Offering insights, tips, and step-by-step instructions on how to install, maintain, and leverage the full potential of this technology.
From enhancing road safety to providing crucial evidence in unforeseen circumstances. This article aims to equip you with the knowledge needed to master how to install dash cams.
Understanding Dash Cams.
Contents
Dash cams have evolved from being optional accessories to essential tools for vehicle owners. They are compact cameras mounted onto the vehicle’s dashboard or wind shield. Designed to record footage of the road ahead or inside the car, some also record from behind.
Initially popular among commercial drivers and law enforcement. Their widespread use among everyday drivers has surged due to their multifaceted benefits. These devices come in various forms, ranging from basic models to sophisticated units equipped with GPS, Wi-Fi, and motion sensors.
While their primary function remains recording, advancements have made them capable of providing additional features. Like parking surveillance, lane departure warnings, and collision detection.
Where we delve into the essential factors to consider when selecting the right dash cam for your needs.
Choosing the Right Dash Cam
Selecting and how to install dash cams isn’t a one-size-fits-all decision. It involves considering various factors to ensure it meets your specific requirements. Here’s a breakdown of crucial aspects to ponder while choosing the ideal dash cam for your vehicle.
Resolution and Image Quality
Resolution determines the clarity of the footage. Common resolutions include 1080p, 1440p, and 4K. Higher resolutions offer sharper images but might require more storage space.
Field of View (FOV)
The FOV dictates how much of the road the camera can capture. A wider FOV provides more coverage, crucial for comprehensive recordings.
Storage Capacity
Dash cams use memory cards to store footage. Ensure compatibility with high-capacity cards for longer recording times. Some models overwrite old footage, while others have loop recording or parking mode.
Additional Features
Consider features like GPS for location tracking, Wi-Fi for easy access to recordings, night vision for better visibility in low-light conditions, and impact sensors for automatic event recording.
Size and Design
Dash cams come in various sizes and designs. Choose one that suits your vehicle’s aesthetics and doesn’t obstruct your view.
Budget Consideration
Determine your budget range and find a dash cam that aligns with both your requirements and financial constraints.
Remember, the “best” dash cam is the one that best suits your individual needs. We’ll guide you through the preparatory steps before installing your chosen dash cam.
How To Install Dash Cams, Preparing for Installation
Before diving into the installation process, it’s crucial to adequately prepare your vehicle and yourself for a successful dash cam setup.
Here’s a comprehensive guide.
Gather Necessary Tools
Collect the tools needed for installation, including screwdrivers, trim removal tools, electrical tape, and cable management accessories. Ensure you have everything before starting.
Choose the Placement
Select the optimal spot for your dash cam. Consider the best vantage point for capturing footage while minimizing obstruction to your view and compliance with local regulations.
Check Compatibility
Ensure your chosen dash cam is compatible with your vehicle’s electrical system and can be installed without causing interference or voiding warranties.
Clean Installation Area
Thoroughly clean the area where you’ll mount the dash cam. Remove dust, grime, or any obstacles that might hinder a secure attachment.
Plan Wiring Route.
Plan the route for the power cable. Conceal it along the vehicle’s interior trims or headliner to maintain a neat and safe wiring setup.
Test Fitment.
Before final installation, do a test fitment of the dash cam to ensure it aligns well with the chosen spot and doesn’t obstruct your view or pose safety risks.
Read the Manual.
Review the dash cam’s installation manual thoroughly. Understand the manufacturer’s guidelines and recommendations for a hassle-free installation process.
By diligently preparing these crucial steps, you set the stage for a smooth and successful installation of your dash cam. In the next section, we’ll delve into the specifics of wiring and power supply for your device.
Wiring and Power Supply.
Ensuring a reliable power supply is essential for your dash cam to function effectively. Here’s a detailed guide on wiring your device.
Understanding Power Sources.
Identify suitable power sources within your vehicle. Common options include the fuse box, cigarette lighter socket, or direct wiring to the battery.
Hardwiring vs. Cigarette Lighter Adapter.
Decide between hardwiring the dash cam or using a cigarette lighter adapter. Hardwiring provides a neater setup and can enable parking mode but might require professional installation.
Fuse Box Connection.
If opting for hardwiring, connect the dash cam to the fuse box using an appropriate fuse tap. Identify a fuse that turns on and off with the vehicle’s ignition to ensure the dash cam powers on/off with the car.
Cigarette Lighter Adapter Setup.
For a simpler installation, plug the dash cam into the cigarette lighter socket. Conceal the cable along the vehicle’s interior for a tidier appearance.
Managing Excess Wiring.
Secure excess wiring by using cable clips or conduits. Proper cable management reduces clutter and minimizes the risk of entanglement or interference with driving.
Testing the Power Connection.
After wiring, test the dash cam to ensure it powers on correctly and functions as expected. Check whether it turns on/off with the vehicle ignition and records footage seamlessly.
Safety Precautions
Ensure all connections are secure and insulated to prevent short circuits or electrical hazards. Follow manufacturer guidelines and, if uncertain, seek professional assistance on how to install dash cams.
By understanding the power sources available in your vehicle and following these steps, you’ll establish a reliable power supply for your dash cam.
Next, we’ll guide you through the installation process step-by-step to ensure a secure attachment of your device.
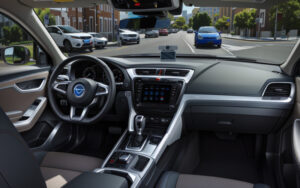
Installing Your Dash Cam.
Now that you’ve prepared and understood the power requirements, it’s time to install your dash cam securely.
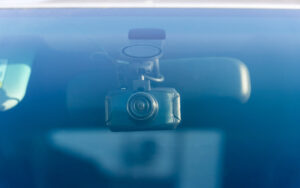
Mounting the Dash Cam.
Attach the mounting bracket to the chosen location on your dashboard or wind shield. Ensure it’s firmly fixed but adjustable for the best angle.
Securing the Device.
Carefully mount the dash cam onto the bracket, ensuring it’s stable and doesn’t obstruct your view. Avoid placing it in positions that may hinder visibility or violate local regulations.
Connecting Power.
Connect the power cable to the dash cam, following the instructions in the user manual. Ensure a secure connection without applying excessive force to the device.
Concealing Wiring.
Hide the power cable along the vehicle’s interior, using cable clips or conduits to secure it in place. Keep the wiring neat and tidy to maintain a clean appearance.
Adjusting Settings.
Power on the dash cam and configure settings such as date/time, resolution, loop recording, and other preferences according to your requirements.
Checking Position and Functionality.
Ensure the dash cam is positioned correctly and captures the desired field of view. Test its functionality by recording a short video to verify image quality and clarity.
Finalizing Installation.
Double-check all connections, making sure the dash cam is securely installed and powered. Adjust the angle or position if necessary before finalizing the setup.
Revisiting the Manual.
Refer back to the user manual on how to install dash cams, for any additional guidance on optimizing the dash cam’s installation or settings.
By following these detailed steps, you’ll successfully install your dash cam, ready to leverage its functionalities. In the next section, we’ll guide you through configuring and testing your newly installed device for optimal performance.

Configuring and Testing
After installing your dash cam, it’s essential to configure settings and test its functionality to ensure it operates effectively.
Adjusting Camera Settings.
Access the dash cam’s menu and fine-tune settings such as resolution, frame rate, loop recording duration, and any additional features like GPS or motion detection according to your preferences.
Checking Recording Quality.
Record sample footage in various lighting conditions to assess the camera’s performance. Verify if the footage meets your expectations regarding clarity and image quality.
Testing Features.
If your dash cam includes additional features like parking mode, G-sensor, or night vision, test each feature to ensure they function correctly and align with your needs.
Adjusting Position if Necessary.
Review recorded footage and assess if the camera’s position needs any adjustments for optimal coverage. Ensure it captures the desired field of view without obstructions.
Verifying Power Supply.
Check if the dash cam powers on and off correctly with the vehicle’s ignition. Confirm that it doesn’t drain the vehicle’s battery excessively when in parking mode.
Familiarizing Yourself.
Take time to familiarize yourself with the dash cam’s interface. Including accessing and downloading recordings, and managing settings for a smoother user experience.
Regular Checks.
Plan to periodically check the dash cam’s functionality, including footage storage. Ensure it operates seamlessly and is ready to capture crucial moments on the road.
Troubleshooting.
If you encounter any issues during configuration or testing. Refer to the user manual for troubleshooting steps or contact customer support for assistance. By configuring and testing your dash cam meticulously, you’ll optimize its performance and ensure it’s ready to serve its purpose effectively.
Next, we’ll cover essential maintenance tips and troubleshooting techniques to keep your dash cam in top condition.
Maintenance and Troubleshooting
Maintaining your dash cam ensures its longevity and reliable performance. Here are key maintenance practices and troubleshooting tips.
Regular Cleaning.
Periodically clean the lens and housing of your dash cam to maintain clear recordings. Use a soft, microfibre cloth to remove dust, fingerprints, or debris.
Check Mounting Stability.
Inspect the mounting bracket’s stability to ensure it hasn’t loosened over time. Re-adjust if necessary to maintain a secure attachment to your vehicle.
Ensure Power Supply.
Regularly check the power connection to prevent loose connections or cable damage. Confirm that the dash cam receives consistent power for uninterrupted operation.
Update Firmware.
Keep your dash cam’s firmware up-to-date by checking for manufacturer-provided updates. Updated firmware often includes improvements in performance and bug fixes.
Review Storage Space.
Monitor the available storage space on the memory card. Regularly transfer and back up important recordings to free up space and avoid overwriting crucial footage.
Troubleshooting Common Issues.
If your dash cam encounters issues such as recording failure, malfunctioning settings, or connectivity problems. Consult the user manual for troubleshooting steps.
Contacting Support.
If troubleshooting doesn’t resolve the issue, reach out to customer support or the manufacturer for guidance. They can provide specific solutions or recommend further steps.
Periodic Testing.
Occasionally test the dash cam’s functionality by recording short clips to ensure it continues to work as expected.
Extreme Weather Precautions.
In extreme weather conditions, such as extreme heat or cold, take extra precautions to protect the dash cam from potential damage.
By following these maintenance practices and troubleshooting techniques. You’ll ensure your dash cam remains in optimal condition, ready to capture crucial moments on the road.
In this section, we’ll explore how to leverage dash cam footage effectively for various purposes.

Leveraging Dash Cam Footage.
Dash cam footage isn’t just recordings, it’s valuable data that can serve multiple purposes.
Insurance Claims Support.
In the event of an accident, dash cam footage can provide crucial evidence to support your insurance claim. It can clarify fault and help expedite the claims process.
Legal Documentation.
Dash cam footage can serve as essential documentation in legal proceedings. It can validate your account of events and provide evidence if you’re involved in a legal dispute.
Improving Driving Habits.
Reviewing your own driving behaviour through dash cam footage can help identify areas for improvement. It allows you to analyse mistakes and become a safer driver.
Preventing Fraud.
Dash cams are effective in combating fraudulent claims. Such as staged accidents or false injury claims. The footage serves as evidence against fraudulent activities.
Enhancing Road Safety.
Sharing noteworthy footage of road hazards, reckless driving, or traffic violations with authorities or online communities. Can contribute to raising awareness and promoting safer driving practices.
Community Contribution.
Joining dash cam communities or forums allows you to share interesting or educational footage. Contributing to a collective effort in promoting road safety and awareness.
Monitoring Vehicle Security.
Utilize dash cam features like parking mode to monitor your vehicle’s surroundings when parked, providing security against theft, vandalism, or hit-and-runs.
Providing Assistance.
In unexpected situations on the road, dash cam footage can assist others involved by providing evidence or clarification of events.
Privacy Considerations.
While leveraging dash cam footage, respect privacy laws and ethical considerations. Avoid sharing footage that intrudes on individuals’ privacy rights.
By effectively utilizing dash cam footage for various purposes while adhering to legal and ethical considerations. You can maximize the benefits of this valuable tool. This concludes our comprehensive guide on mastering dash cams – from installation to leveraging their potential.
Conclusion: Embracing the Power of Dash Cams.
In the ever-evolving landscape of road safety and vehicle technology, dash cams have emerged as indispensable tools. Throughout this guide, we’ve navigated the intricate realms of dash cam installation, usage, and leveraging their full potential. From understanding the nuances of dash cam technology to selecting the right device for your needs.
We’ve explored the crucial steps needed for a successful installation. We’ve delved into configuring settings, troubleshooting common issues. And maintaining these devices for optimal performance. Moreover, we’ve highlighted the multifaceted nature of dash cam footage. Not merely as recordings but as powerful evidence. Tools for improving driving habits, and instruments for contributing to road safety.
As you embark on your journey with dash cams, remember the significance of responsible usage, respecting privacy, and adhering to legal considerations. Utilize these devices as tools for safety, documentation, and community engagement while fostering a safer and more aware driving environment.
Keep exploring, learning, and leveraging the potential of dash cams to enhance not only your driving experience but also the safety of the roads we share.
Thank you for joining us on this comprehensive journey into how to install dash cams.
Safe travels and may your dash cams serve as your vigilant companion on the roads ahead. We hope you really enjoyed our write up to on how to install dash Cams.
Please bookmark this page and return soon for more articles and product review. If you looking to buy a new dash cam feel free to read our full Dash Cam Reviews.
If you’re on a budget and looking for a good Dash Cam with a lower price tags click through here to read our Orskey Dash Cam Review.
Got a little bit more budget, check out the Jomise J6 Dash Cam Review here.
Looking to go full out top of the range quality with a good price tag see our, Redtiger Dash Cam Review.